
Monday, April 29, 2013
Airing My Dirty Laundry
In a brief moment of panic last night, I realized that anyone, anywhere could see what I did on an average day by looking at my photos {shocker, I know}. Now, I had thought about family and friends looking at them, but everyone else?!?!?! All of a sudden I wasn't so sure what I thought about that. If you've spent any time looking at my daily pictures, you know that my carpet isn't always clean, the dishes and laundry pile up, and so on... But that moment passed, and I began to appreciate the freedom in that, too.

So on that note, I'm airing my dirty laundry {literally}. As I walked around the house today, I became cognizant that there were nine {NINE!} different piles of laundry laying around, not including the big one in the basement by the washing machine. Holy moly. This week's goal: to sort, wash, organize and PUT AWAY said preponderance of laundry. And there's more...
I'm good at starting all kinds of projects but I suck at finishing them.
Sometimes I'm too lazy to serve a vegetable with dinner.
Sometimes I'm too lazy to serve a vegetable with dinner.
I don't remember to wash the sheets every week {or sometimes two}.
The dishes pile up {a lot} and so does the mail.
Playing on the floor with the kids? Ya, that's not really my thing...
The dishes pile up {a lot} and so does the mail.
Playing on the floor with the kids? Ya, that's not really my thing...
There are boxes I still haven't unpacked from when we moved almost two years ago.
I get angry and yell at my kids, especially on the way out the door to school.
Organization is not my forte.
I haven't mopped the kitchen floors in a month {or two, or three?}. Seriously.
And that's me. Just ME. For all the world {apparently} to see.
Why am I comfortable sharing all of that? Because I have a feeling that a lot of me looks like a lot of you. I sin. I fall short. I don't always clean up, follow up, follow through, or follow directions. And that's okay. Because I'm human, and so are you. No one is perfect, and you know what, it's a relief to stop pretending to be so. There's only one Person who is, and none of us are it. I want people to really get that, and I want to be the kind of woman that people look at and they're like, "whew, I'm glad I'm not the only one who..." or "thank GOD it's not just me that..." It's so easy to look at Facebook, Pinterest, or Instagram and think that life is always beautiful, picturesque, and perfect, and so are the people. And to not be so perfect all the time makes you a complete and utter failure, especially as a mom.
Thankfully, that's not reality! We have a God who has redeemed us and who has created us each with a unique set of gifts and abilities. It's time we not only rejoice in our strengths and gifts but also relish our weaknesses, because when we are weak HE is strong! God can heal, fix, redeem, and even use those areas where we fail. And there is freedom and healing there, friends. Freedom to Just. Be. You. In all your glory, with all your beautiful flaws. Take a look around at your cruddy floors, cruddy kids, cruddy microwave, and cruddy toilets {you know they are--admit it!!} and PRAISE GOD, because it's okay. You're okay. Crud and all.
"When we live in that picture of what should be instead of what is, we add a layer of guilt on top of what is already very difficult. And that makes it almost impossible. It's extremely counter cultural to admit that life is not perfect. I think that people are desperate to admit together that life is messy, and that marriage is hard, and that parenting is excruciating sometimes. And that doesn't mean that you're doing something wrong. It's hard because it's supposed to be."
~Glennon Doyle Melton
Sunday, April 28, 2013


Saturday, April 27, 2013
April 26
Sparkle for a Cure!!! What a great fundraiser event!! Thanks to all who helped & participated!


Wednesday, April 24, 2013


Sneaky Chocolate Mousse
If you enjoyed the Sneaky Chocolate Dip, then you will LOVE her whipped, creamy cousin, Sneaky Chocolate Mousse. It's as fluffy, smooth, and chocolatey as it looks, perhaps even more so, and bonus: it's good for you!!

Sneaky Chocolate Mousse
1 over-ripe banana
2 ripe avocados
1 handful spinach
3 tablespoons unsweetened cacao powder
1/4 cup coconut milk
1/4 cup pure maple syrup
1 teaspoon pure vanilla extract
1 teaspoon cinnamon
1/8 teaspoon salt
Combine all ingredients in a food processor or blender and process until smooth and creamy. Serve alone, with fruit, or with whole wheat pretzels for dipping.
Enjoy {without guilt}!
Tuesday, April 23, 2013
Lovely Details: Magnolia Trees
A lovely detail to appreciate today: Magnolia trees. Spring is in bloom!!


April 20
The littles & I went to Alana's 4th Birthday Party at the Children's Museum. It was fun! Happy birthday, Alana!

Easy Whole Wheat Pizza Crust
We have pizza/movie night most Friday evenings, and I feel much less guilty about serving pizza to my family when it's made out of fresh, whole, homemade ingredients. This pizza crust is so delicious--I promise, you won't even know its whole wheat! We usually make a cheese pizza for the kids and a "Whatever Pizza" {whatever's in the fridge!} for my husband and I. This recipe is a favorite in our house, and if you try it, I'm guessing it will be in yours, too! It will make enough for two large pizzas, and even with our family of 6, we still have some left over. If you won't use two crusts, just divide the dough in half and freeze some for next time.
 |
| Ham, vine tomatoes, and onions |
Whole Wheat Pizza Crust
{adapted from 100 Days of Real Food}
2 1/4 cups warm water
1 tablespoon + 1 teaspoon active dry yeast
A pinch of honey or other sugar
1 tablespoon + 1 teaspoon kosher salt
4 tablespoons EVOO
6 cups whole wheat flour
{I use King Arthur's White Whole Wheat Flour}
{I use King Arthur's White Whole Wheat Flour}
Grated mozzarella cheese
Toppings of your choice
Preheat the oven to 500 degrees F. Add the yeast to the warm water, add a pinch of honey/sugar, and allow the yeast to bloom. If it doesn't get foamy, it isn't alive. Meanwhile, in a stand mixer with a dough hook or food processor with a dough blade {or by hand}, combine the salt, EVOO, and whole wheat flour. Turn the mixer on low and gradually pour in the water/yeast mixture. Continue mixing until the dough forms a ball. There shouldn't be any flour left on the bottom, and the dough also shouldn't look too wet. If either of those occur, add more water or flour, respectively. Having made this dough using different whole wheat flours, I've realized that not all flours are created equal. This recipe will turn out perfectly using the flour mentioned above. If using a different flour, more water may need to be added to achieve the right consistency.
 |
| Have your kids help--this is a fun one for them to participate in! |
Take the dough out and kneed it into a smooth ball. The dough should be very pliable, almost rubbery, not sticking to the counter at all. Return the dough to bowl, lightly coat it in olive oil, and cover tightly with foil. No need to refrigerate it. Allow it to rise for at least a half hour or until it's doubled in size.

Once it's risen, cut the dough in half. Kneed into a ball, pat it flat, and roll it out into a round crust. Fold the dough in half, then in quarters to easily transfer it to a lightly oiled cookie sheet. I find that once you get the dough onto the cookie sheet, you can continue to gently stretch it out into the desired size. Add a few ladles of your sauce, cheese, and toppings. Cook the pizzas for 10-12 minutes, or until the crust is lightly browned.
 |
| Black olives, green olives, onions, buffalo chicken, grape tomatoes, and yellow bell peppers |
 |
| Buffalo chicken, blue cheese, caramelized onions, and red peppers |
There are plenty of combinations that don't require pepperoni {have you looked at the ingredients on those things?!?!}, but you can use those, as well. I still buy them on occasion. Whatever you decide to use, have fun, and enjoy!
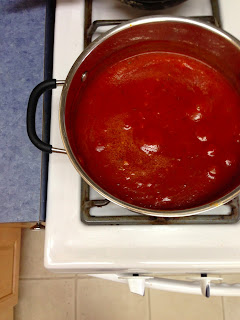
Easy, Delicious Tomato Sauce
This sauce is a staple at our house, so I make it at least every week or two. It's easy, it's delicious, and you cannot find a tasty sauce like this at the store. There are two secrets to this sauce: 1) letting it simmer all. day. long. & 2) choosing a good canned tomato sauce to start with. Hunt's makes a great sauce, as well as Stokelys and RedPack. I wouldn't recommend using other brands, with the exception of organic canned tomato sauce. And as always this recipe will leave you with lots of sauce left over to use for several meals or freeze for later.

Homemade Tomato Sauce
4 29 oz. cans tomato sauce
1 medium yellow onion, chopped
4-5 cloves garlic, minced
handful fresh basil, chopped, or 1 tablespoon dried basil
Extra Virgin Olive Oil
Fill the bottom of a large pot with the olive oil. And when I say fill it, I mean fill it. Make sure that entire bottom is covered and then some. Remember, fat=flavor, and this good fat will give your sauce a lot of flavor. Trust me. Turn the burner to medium heat and warm the oil. Add the onion and cook until it begins to brown, about 5-7 minutes. Add the garlic and cook another minute or two. Add the canned tomato sauce, stir, and turn the burner up to high, stirring occasionally. Once the sauce begins to boil, turn the heat down to low and add the basil. Cook, uncovered, stirring occasionally, for a minimum of one hour but preferably all day, if you can.
Serve it on top of some whole wheat pasta with a spinach salad.
 |
| It will make quite a mess on the stove, but it's worth it! What it lacks in cleanliness it will make up for in flavor. I can say the same thing about my house, or myself, for that matter. lol |
Serve it on top of some whole wheat pasta with a spinach salad.

And you can use the leftover sauce to make yummy, homemade pizzas. This whole wheat crust is delicious--I promise, you won't even know it's whole wheat!!
|
| Vine tomatoes, ham, and onions |
Monday, April 22, 2013
Ruby's 5th Birthday Party!

We finally had Ruby's Birthday Party on Sunday, even though her actual birthday was Wednesday the 17th. It went really well {I think!}, and we even had everything set up and ready to go by the time people walked in the door! :) Let me just say that I'm NOT an event planner, but it all came together ok!

 |
| Daddy bought her some PINK flowers! |

 |
| Watermelon Punch {Recipe here} |

My talented sister ran a little nail salon for the girlies. They enjoyed it!


This was my first attempt at a homemade cake {not from a box} and using natural ingredients for dye. I used a recipe for a healthiER birthday cake {here}, and it turned out ok. It tasted really good, but it fell and was VERY dense. I'm not sure what I did wrong, so I'll try again sometime. If we had just renamed it a blonde brownie cake {like my mom suggested}, I would've nailed it. :) But it looked good, right??
I tried to dye the cake itself pink with beet juice, but even though it went into the oven slightly pink, it didn't come out that way. So if you're thinking about trying to dye the actual cake, it's not worth it. We used a recipe for Quick Vanilla Buttercream {which is heavenly and soooo worth it if you're looking for an easy, natural frosting recipe}. I did mash up some beets and used 1 tablespoon to get the light pink color. We were hesitant to put in more for fear it would taste like beets. I was a little disappointed it didn't achieve the brilliant, deep pink I was going for, so next time I'll try finely grating an actual beet instead of using ones from a can.
Present time. She's been waiting for this!!


  |
| Her little friend Aubrie {from preschool last year} was able to come. She was very excited! These girls were two peas in a pod. |
I didn't get any pictures of the tall guests, I realized, but she had lots of friends and family come to celebrate with her. Thanks to everyone who came--she was blessed!!
Friday, April 19, 2013

Quick Strawberry Chia Jam
There's nothing quite like fresh, sweet strawberries. They taste like summer! My kids can't get enough of them during the warmer months. And now that they are in season, it's a perfect time to buy lots of them and make some jam. You will find it fairly easy and painless and oh so much better than anything from the store. I always double or triple my recipes, because I figure if you're going to all the trouble to make something from scratch, you might as well make it worth your while. This recipe will leave you with extra to put in the freezer.

Quick Strawberry Chia Jam
{Prep time: 5 min, Total time: 35 min, yeilds 32 oz.}
2 lbs. {32 oz. or 4 cups} fresh Strawberries, chopped
1/3 cup honey
1/4 cup Chia Seeds
Place the roughly chopped strawberries and the honey into a saucepan and cook over medium heat. After the strawberries have started to soften and release their juices {5 minutes}, add the chia seeds and stir. If you don't want to use chia seeds as a thickener, you can use a chopped, sweet apple instead for the natural pectin. Continue to cook the strawberries, stirring occasionally, until they are soft enough to mash with a potato masher {another 5-10 minutes}. After you have the berries mashed, turn the heat down to medium low and continue to simmer, stirring/mashing occasionally, until it thickens into a jam {about 15 more minutes}. Remove from the heat and allow the jam to cool. It will continue to thicken as it cools.

Once cool, spoon jam into 2 pint size mason jars {or 4 half-pints, depending on how much you will use at a time}. You can get plastic lids online or from Walmart--I think they're easier and more convenient then the metal ones for regular use. Stick one in the fridge {will keep for 1-2 weeks} and one in the freezer for later {will keep for a few months}.
The jam is especially tasty with some butter on a whole wheat biscuit. Mmmmm.... This recipe doesn't say to, but they come out much better if you use whole wheat pastry flour.

And enjoy! Your Saturday mornings will never be the same. ;)


Subscribe to:
Comments (Atom)